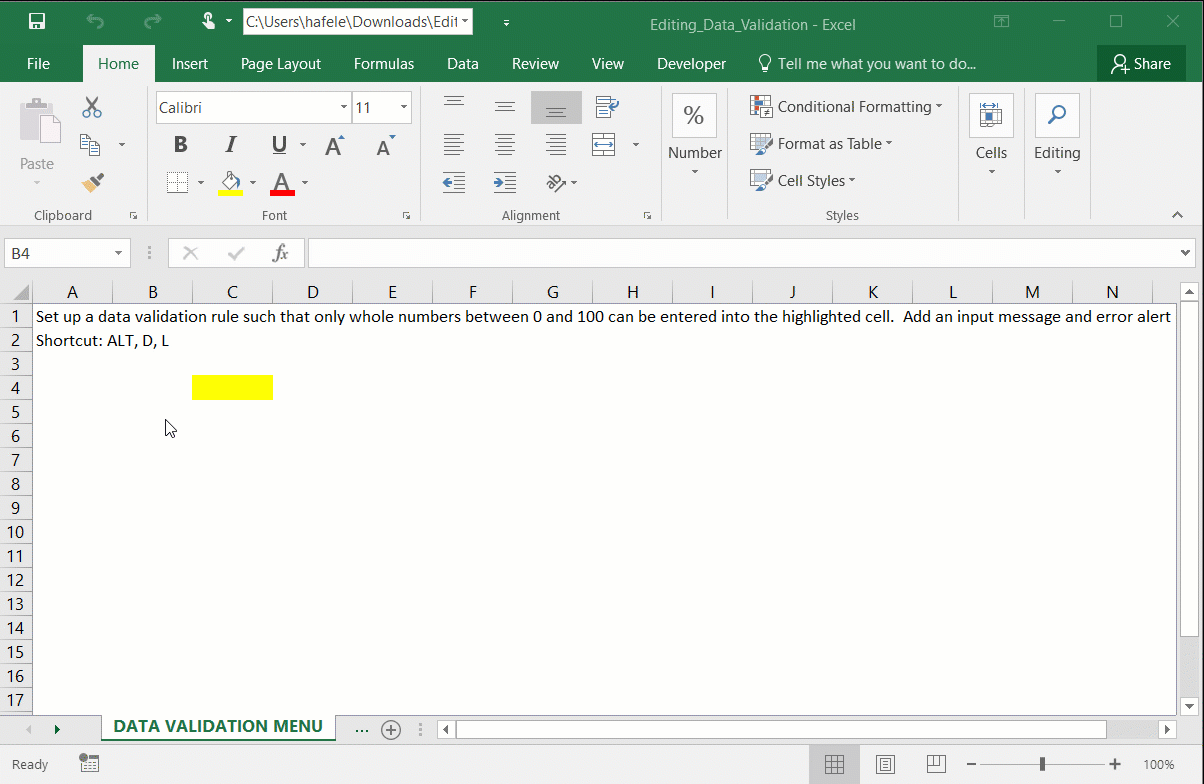
In certain circumstances, you need to restrict what users can and cannot enter into cells
You may also feel the need to provide users with data entry instructions, or alerts when incorrect information is entered
Data validation is the tool to use in such cases
What is Data Validation?
Data validation functionality allows users to do three things:
Set criteria which can be entered in cells
e.g. "Users should only be able to enter whole numbers between 0 and 100"
Provide input box messages
e.g. "I want a message to pop up that says Enter a Number Between 0 and 100 when I select that cell"
Provide error messages when invalid data tries to be entered
e.g. "If 200 is entered, I want an error message to say YOU DIDN'T STAY BETWEEN 0 AND 100!"
But why use data validation?
The answer is relatively straight forward - using data validation helps to:
Reduce incorrect data entries
Maintain consistency within your files
Buttons
The relevant buttons can be found in the Data Tools group of the Data tab:
To use the data validation functionality, first select all relevant cells and then click the Data Validation... button above
When clicking the Data Validation... button, the Data Validation menu becomes available
The Data Validation menu has three tabs:
Settings
Input Message
Error Alert
This menu is central to this lecture, so let's review these three tabs in more detail
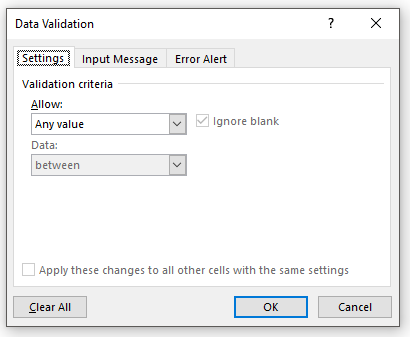
Data Validation Settings Tab
The Settings tab allows you to define what data are allowed (and not allowed) in the selected cells
By default, any value is allowed in all cells in your worksheet (as shown in the menu above), but this can be changed
But when should you change the validation criteria from "Any Value" to something else?
Here are some example of situations in which changing the validation criteria would be useful:
"Only whole numbers should be entered in this cell"
"Only positive numbers should be entered in this cell"
"No duplicates should be entered in this range of cells"
"Only a date in the current calendar year should be entered in this cell"
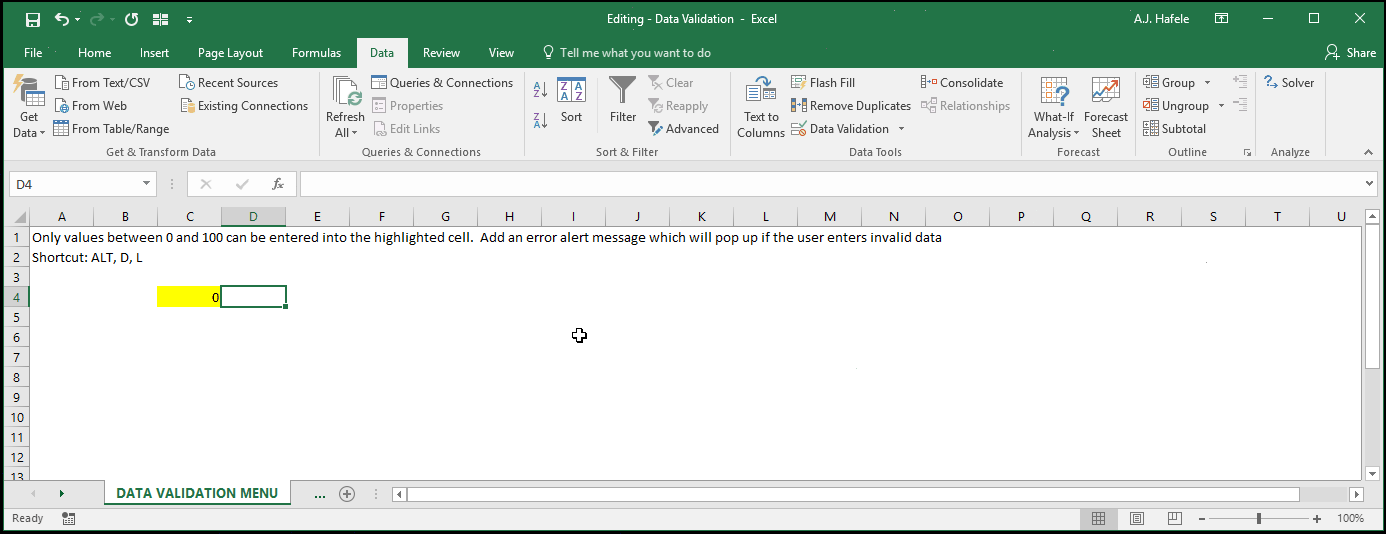
Observe as we restrict a cell to whole numbers between 0 and 100 by modifying the first Data Validation menu tab (only):
Notice that we were unable to enter 150 into the highlighted cell, since it violated the validation rule
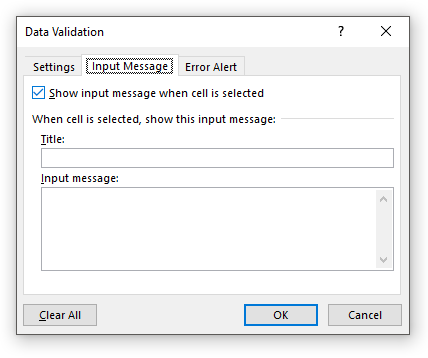
Data Validation Input Message Tab
The Input Message tab allows you to enter a message that appears when (and only when) that cell becomes the active cell
As the name implies, input messages are used to provide users guidance on inputting data
However, you can treat input messages as cleaner versions of a cell comments
Continuing with the prior example, observe as we add an input message to the highlighted cell:
As you can see, an input message is similar to a cell comment, but with some differences:
In order to see an input message, the cell containing the input message must be the active cell
You cannot hover over the cell with a mouse to read the message (as with cell comments)
While cell comments are flagged with small red triangles inside the cells (at the top-right side), cells with input messages do not have any such flags
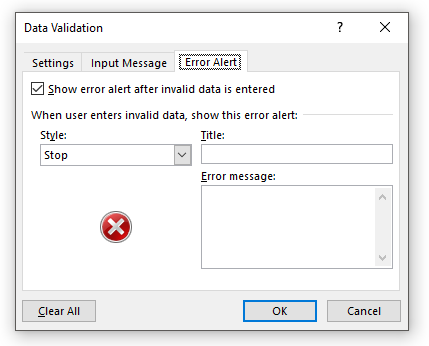
Data Validation Error Alert Tab
Within the Error Alert tab, you have the ability to select how errors are handled (i.e. you can change the error "style"), as well as provide a custom message to the user indicating that an error has occurred
But what are "errors", exactly?
Errors occur when someone enters data into a cell which violates the validation criteria specified in the Settings tab
In the first illustration above, an error occurred when we tried to enter 150 in the highlighted cell; a generic error alert popped up, in that instance
There are three Error Alert styles to choose from
Stop: completely prevents you from entering the incorrect data (this is the default)
Warning: warns you that the data do not follow the validation rules, but you can choose to enter the data
Information: warns you that the data do not follow the validation rules, and enters the data
Observe as we use the Stop style with a custom error message:
Observe as we use the Warning style instead:
Notice that the Warning style will let us enter invalid data if we choose!
Last, observe as we use the Information style instead
It is very similar to the Warning style, except the icon is different
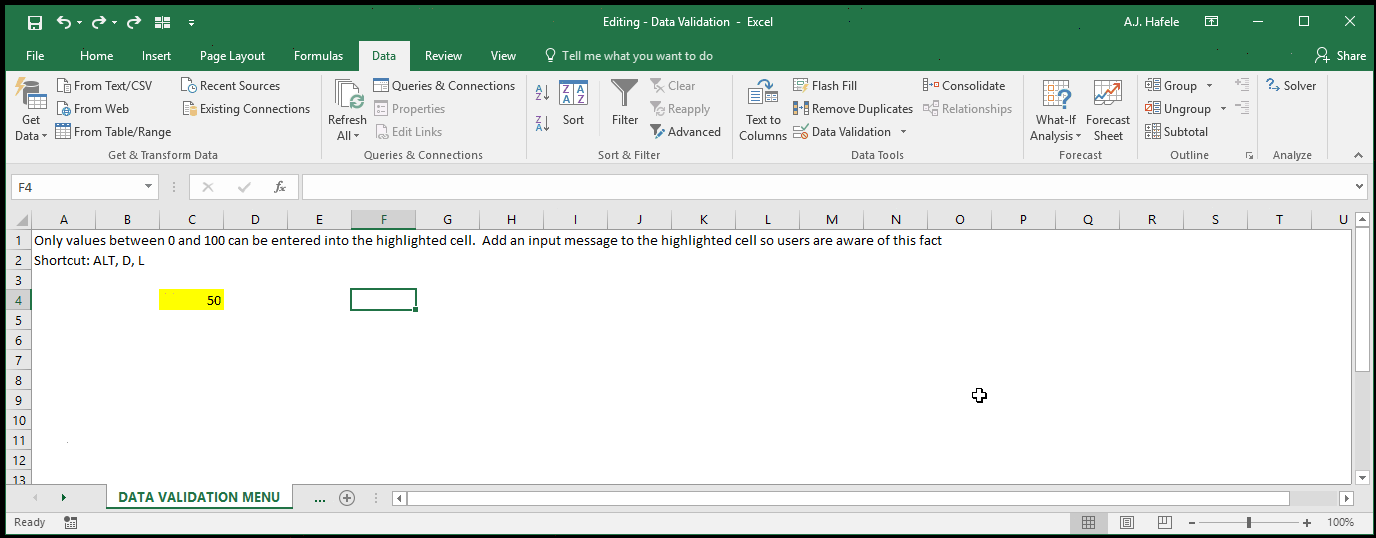
Which Cells Will Obey Validation Rules?
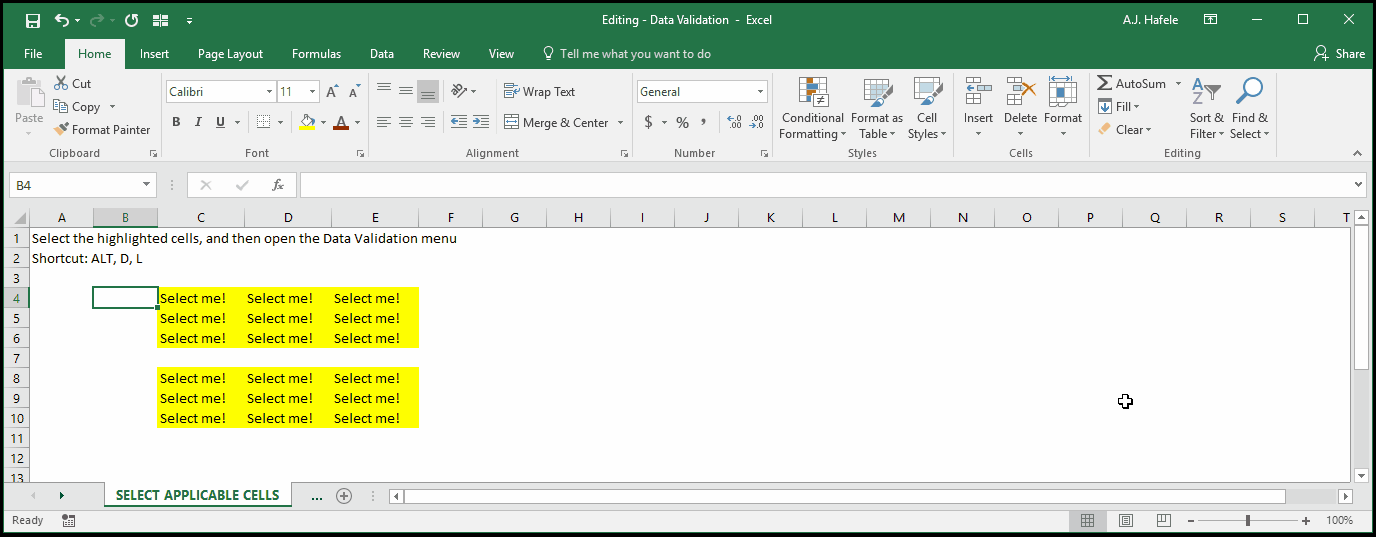
You can easily apply data validation rules to any cells, as follows:
First, select all cells that you want to apply the rules to
Second, go to the Data Validation menu
Third, select your desired data validation options (as illustrated previously)
Cells not selected will not be forced to obey the data validation rules
Observe as we select a non-contiguous range of cells and bring up the Data Validation menu (shortcut is ALT, D, L):
Once we make our selections in that menu and click OK, only the yellow cells will be impacted by the rule
Last, note that only a single validation rule can be applied to each cell
More Examples
The coming examples are fairly detailed, so please review them carefully
Be sure to use the lecture's Excel file as you review the examples
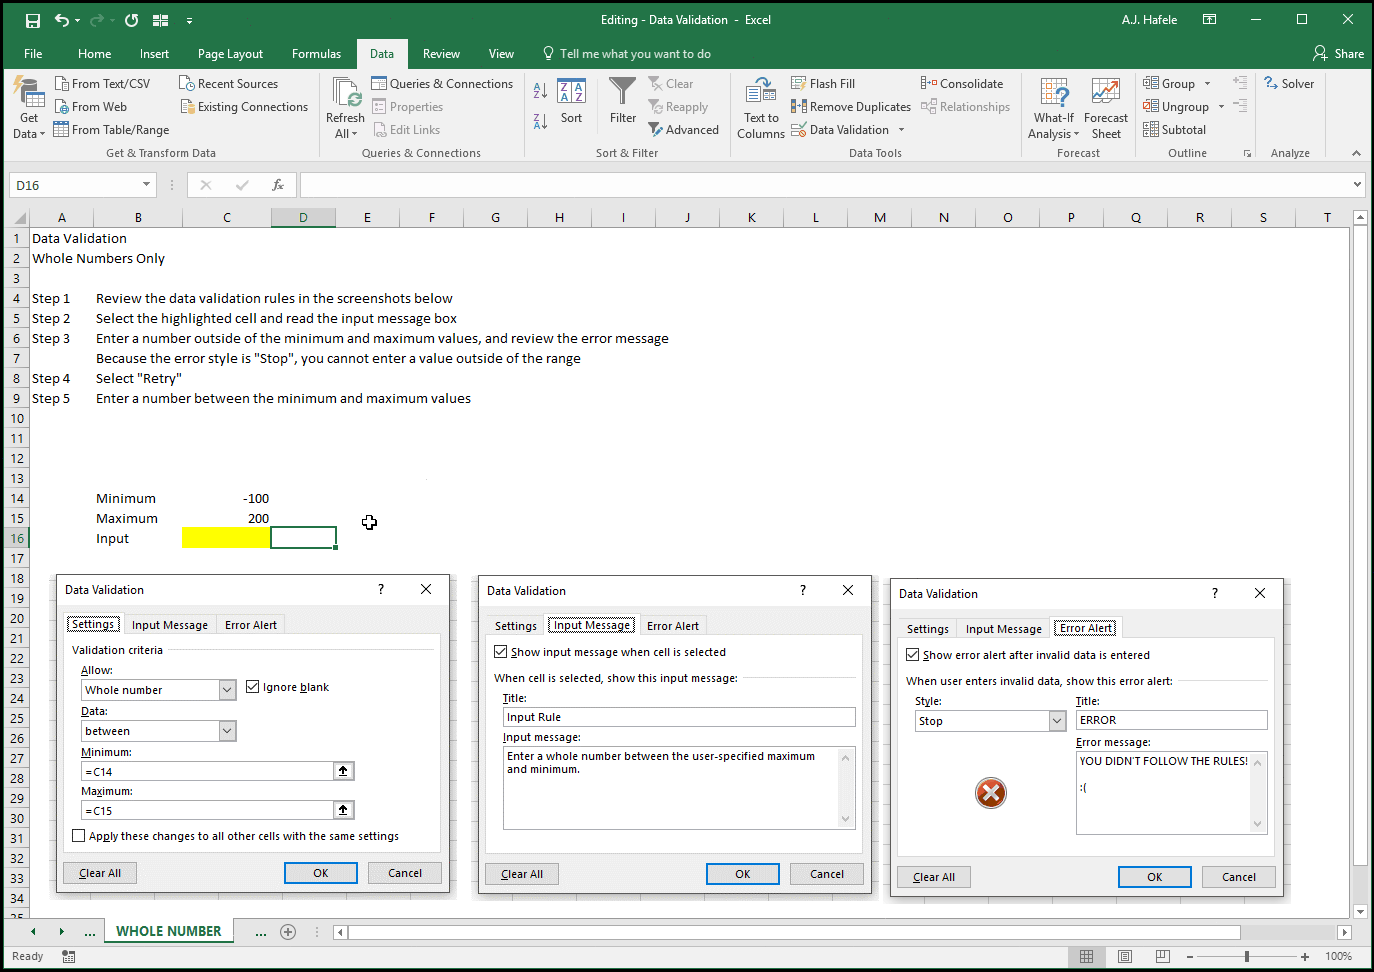
Example 1: Allow whole numbers only:
Notice above that we can actually reference cells (e.g. C14 and C15 as the minimum and maximum, respectively) when creating data validation rules!
Example 2: Allow numbers (including decimals) greater than a minimum value:
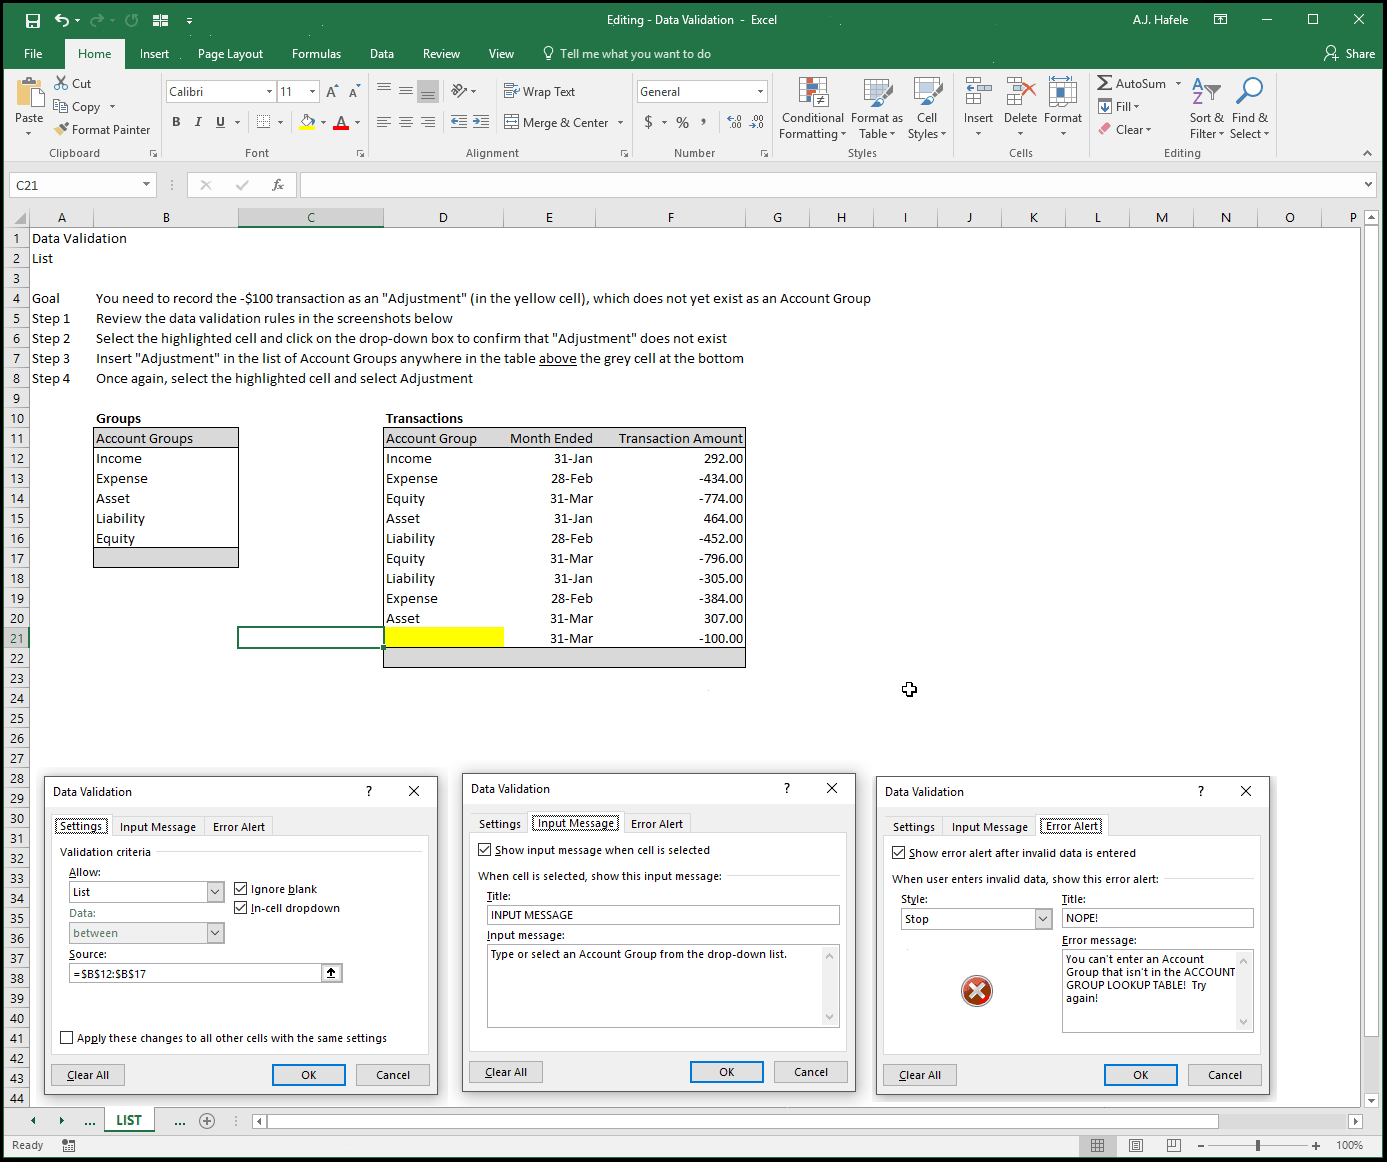
Example 3: Allow a customized list of data only:
Note that:
We used the CTRL+SHIFT+= shortcut to insert a new cell in the Account Group list (cell B15)
After adding the new Account Group, the list's Source (in the Settings tab) adjusted to capture cells B12 to B18 (versus B12 to B17 before the list update)
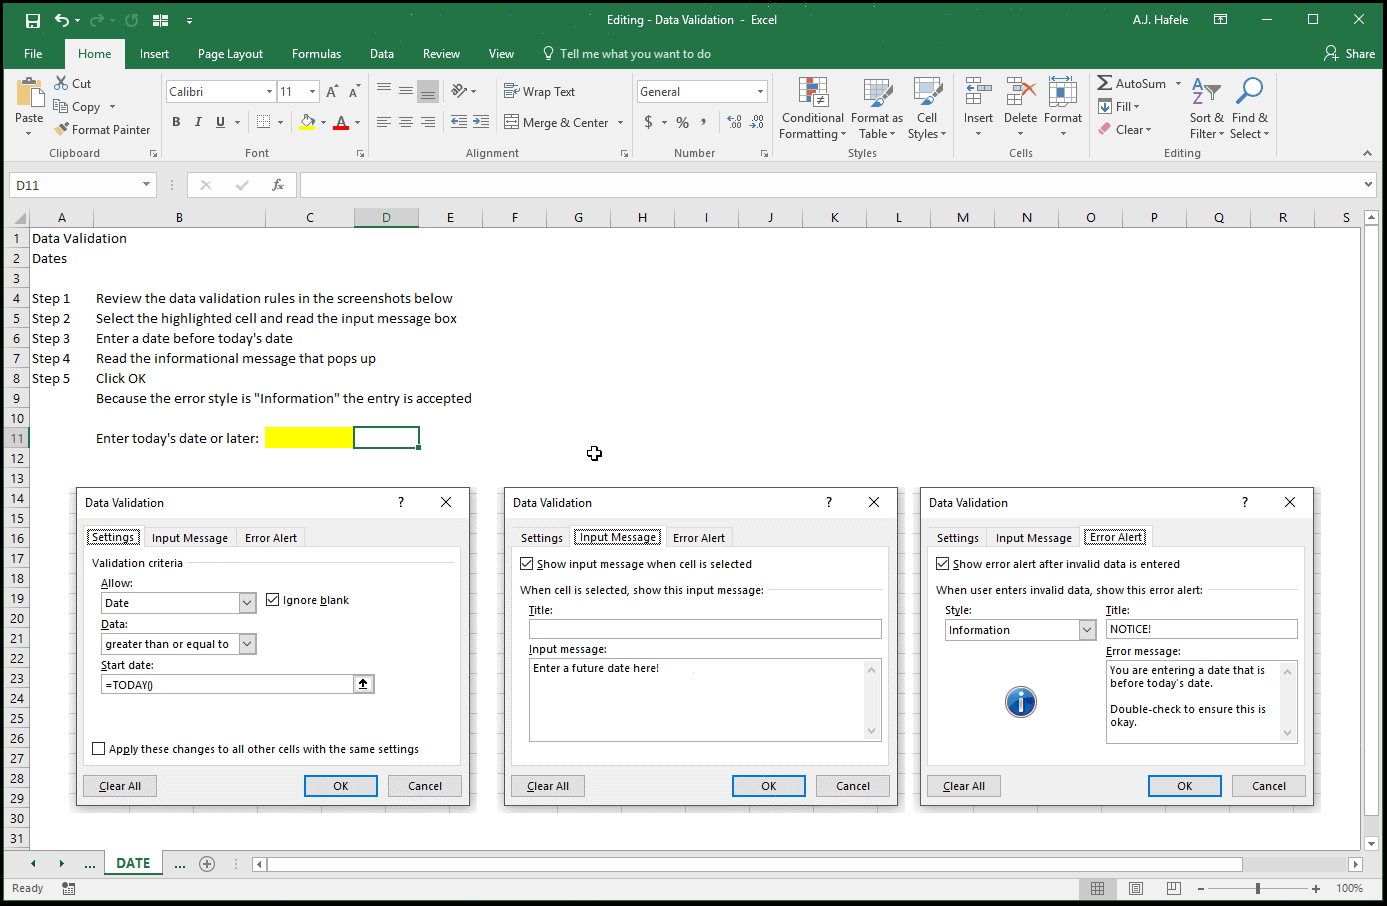
Example 4: Allow dates greater than a specified date:
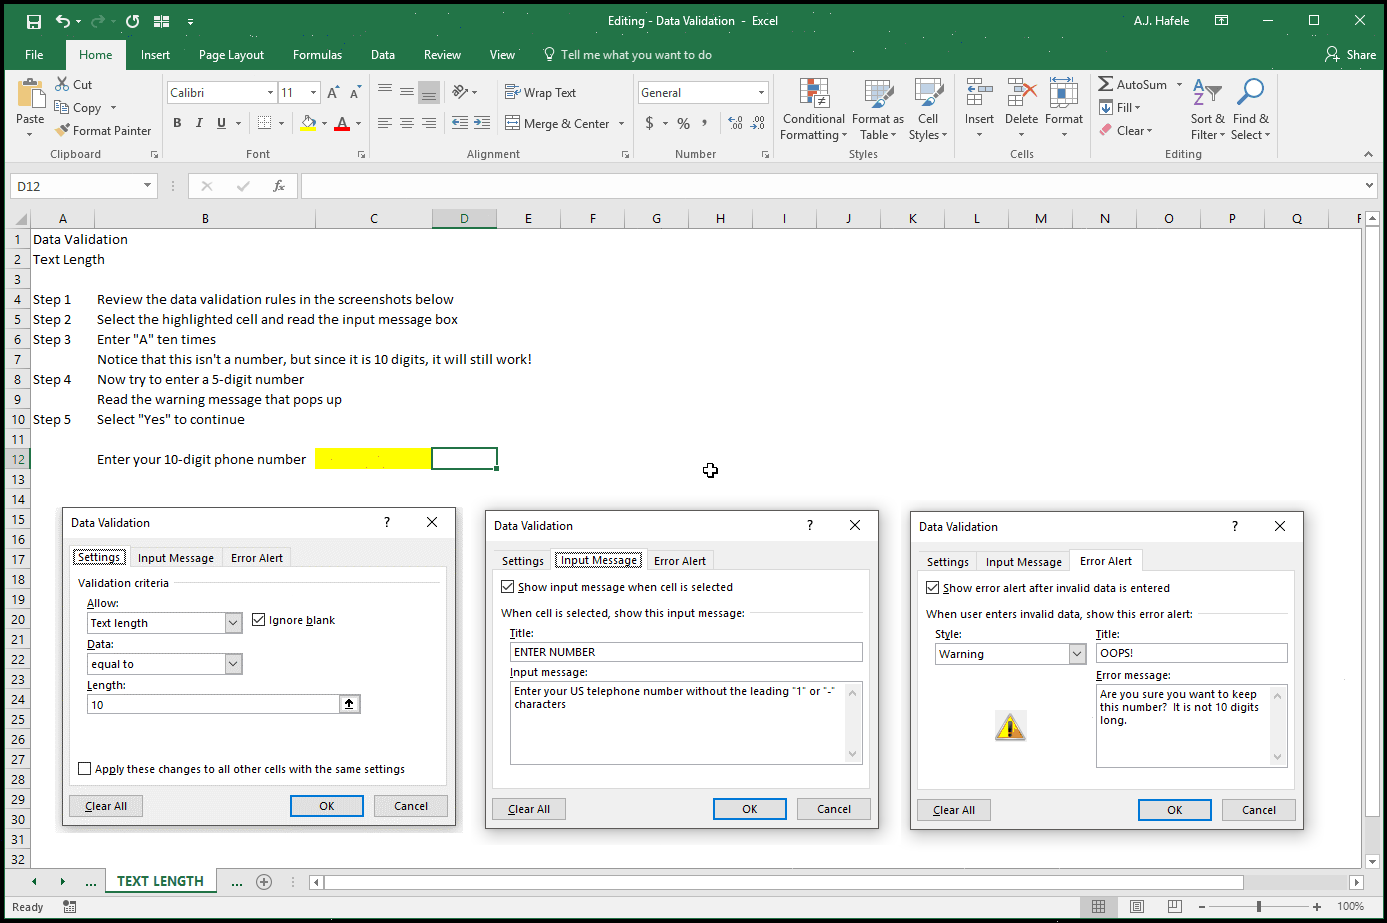
Example 5: Create specific text length requirements:
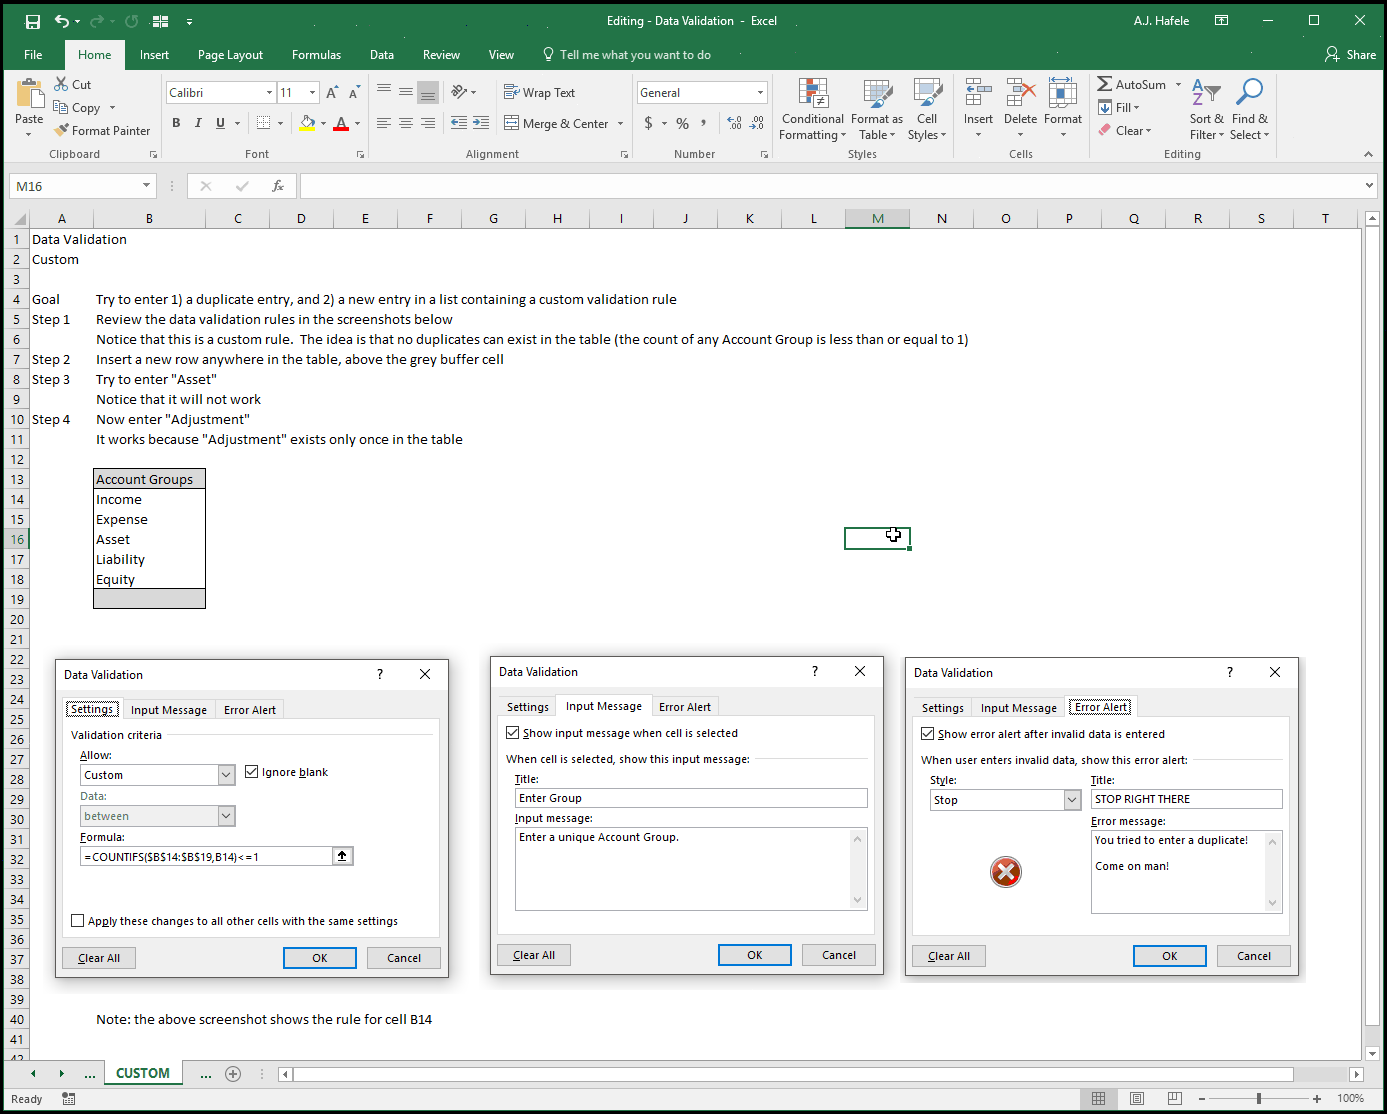
Example 6: Custom validation rule:
Note that the above custom rule utilizes the COUNTIFS function (discussed in a future lecture here)
Do not worry if you are uncomfortable with the formula's syntax at this point. Just know that the formula used in the Settings tab is disallowing any entries if they are counted more than once
Note On Invalid Data
As shown above, invalid data can still be entered if the Error Alert Style is Warning or Information
In addition, invalid data can be entered if the Error Alert Style is Stop!
This can occur in a number of ways
If you copy and paste special (values) invalid data into a cell with data validation, the pasted values will not be rejected
You can first enter data into a cell with no validation rule (e.g. 99), and subsequently create a data validation rule which contradicts the entered data (e.g. the cell value must be greater than 100)
This highlights the fact that data validation functionalities in Excel are not error-proof
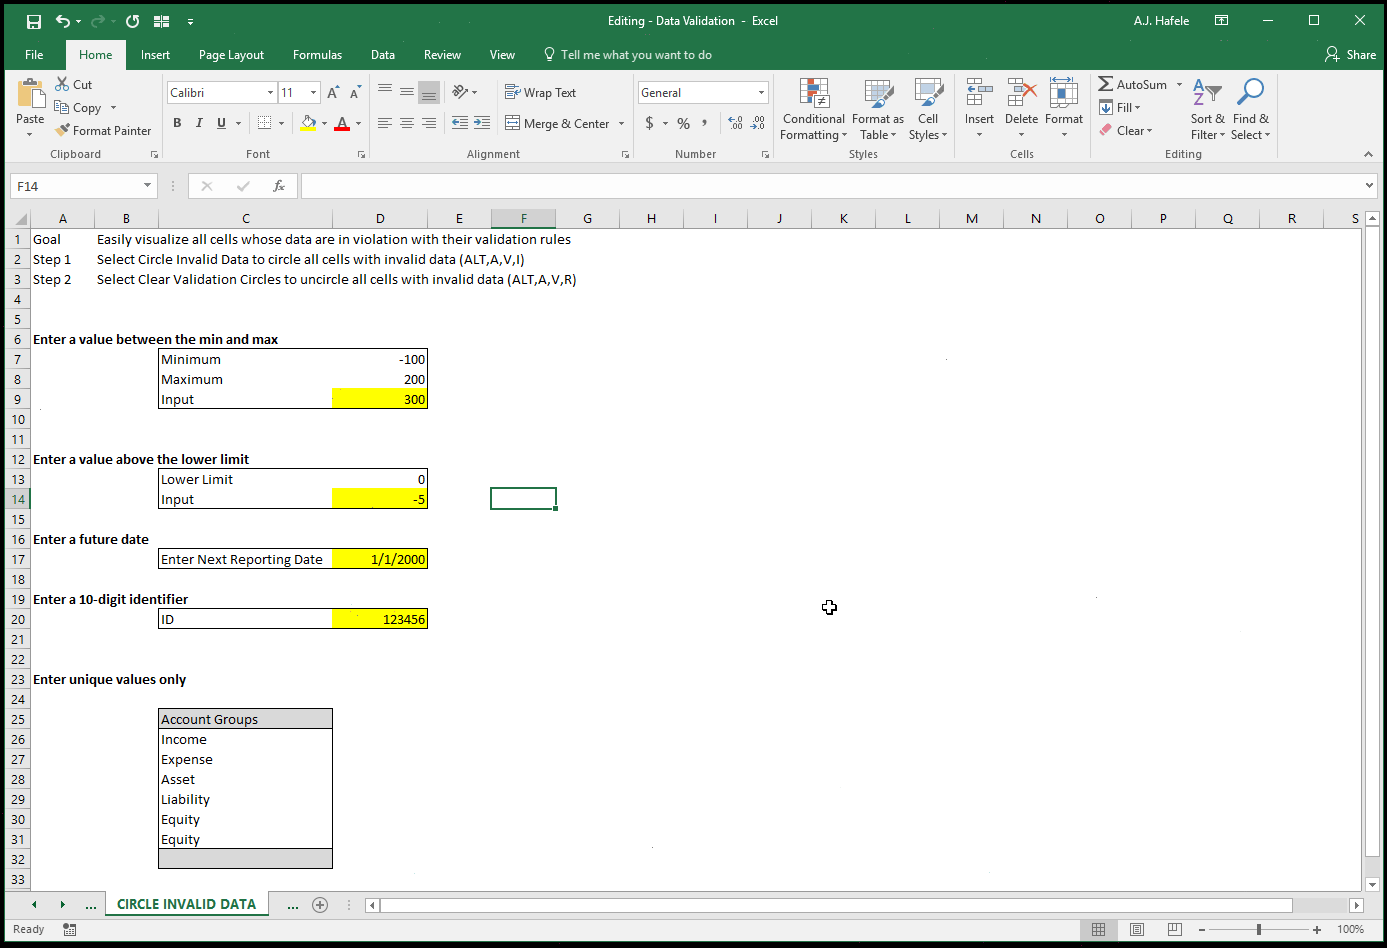
Circle Invalid Data
Given that users can still enter data that violate the validation rules, it is sometimes useful to see which cells are in violation of their rules
This is easily done by selecting Circle Invalid Data (ALT, A, V, I)
Removing the circles is done by selecting Clear Validation Circles (ALT, A, V, R)
Observe as we circle invalid data and subsequently remove the circles in the following example: