Copying and pasting are vital computing functions, not only with respect to Excel
Copying and pasting is essentially the same as making a duplicate of already-created information
Copying is the first step in the process
User-selected data are temporarily stored behind-the-scenes (in what is called the clipboard)
Pasting is the second step in the process
Copied data are duplicated in another location
You can paste Excel data into many non-Excel applications, but we will focus only on pasting within Excel
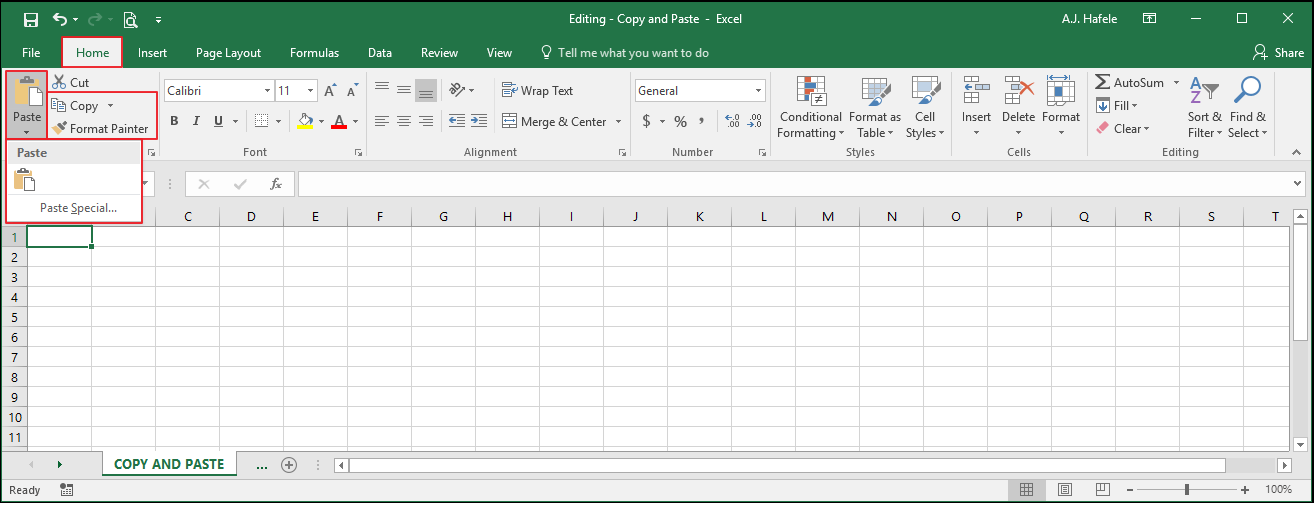
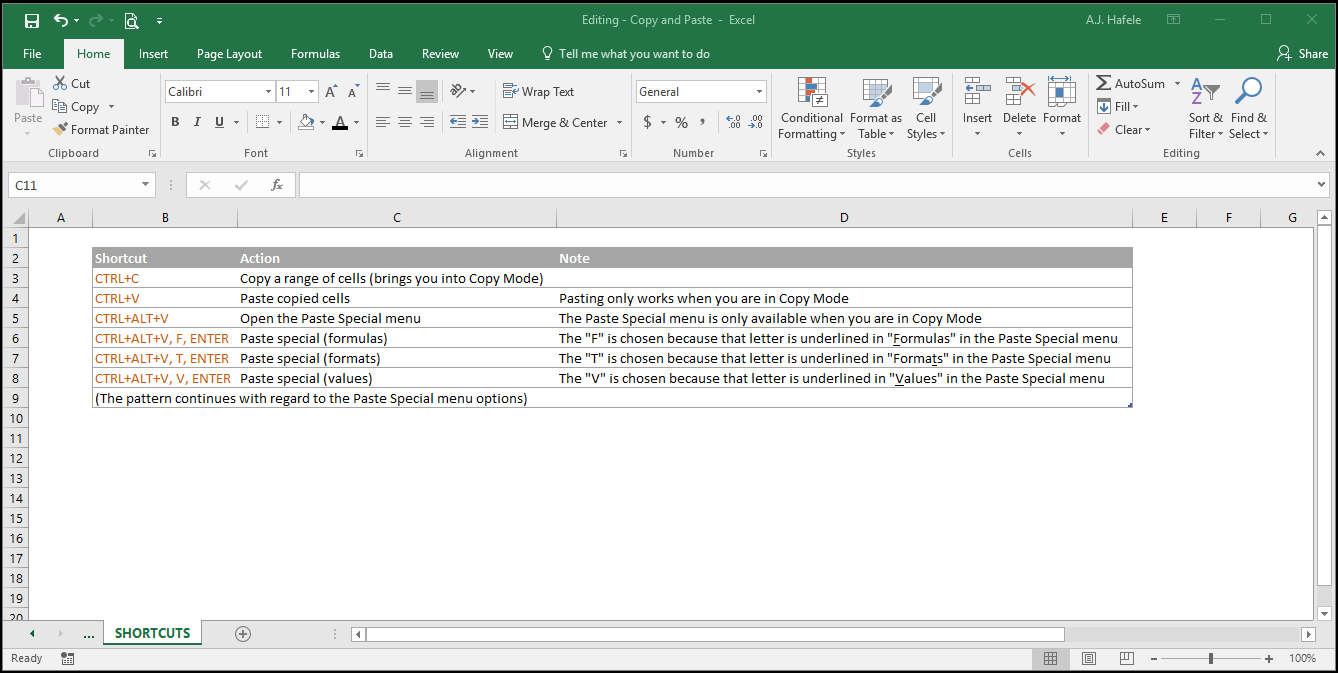
Buttons
The buttons relevant to this lecture can be found in the Clipboard group of the Home tab, as shown here:
These buttons (and their equivalent shortcuts) will be used throughout the lecture
The Paste Special menu appears when the Paste Special... button shown above is selected:
Why are some letters in the Paste Special menu underlined?
Those are the keyboard shortcuts you can use to select the various options in that menu!
Examples are below
Basic Copy and Paste
To copy and paste, do the following:
Select the data to be copied
Click the Copy button (or press CTRL+C) to copy the data
The copied data will show a moving dashed border as per above; this indicates you are in Copy Mode
Select the destination of the soon-to-be-pasted cells
Click the Paste button (or press CTRL+V) to paste the data
At this point, you are still in Copy Mode (and the moving dashed border is still present), so you can select a new destination and paste again, you can repeat this process as many times as necessary
Press ESC to exit Copy Mode
The data copied – both the contents and the formatting – are now pasted to the destination (or destinations)
Importantly, any prior content will be overwritten! In the above example, notice that the yellow highlight disappeared
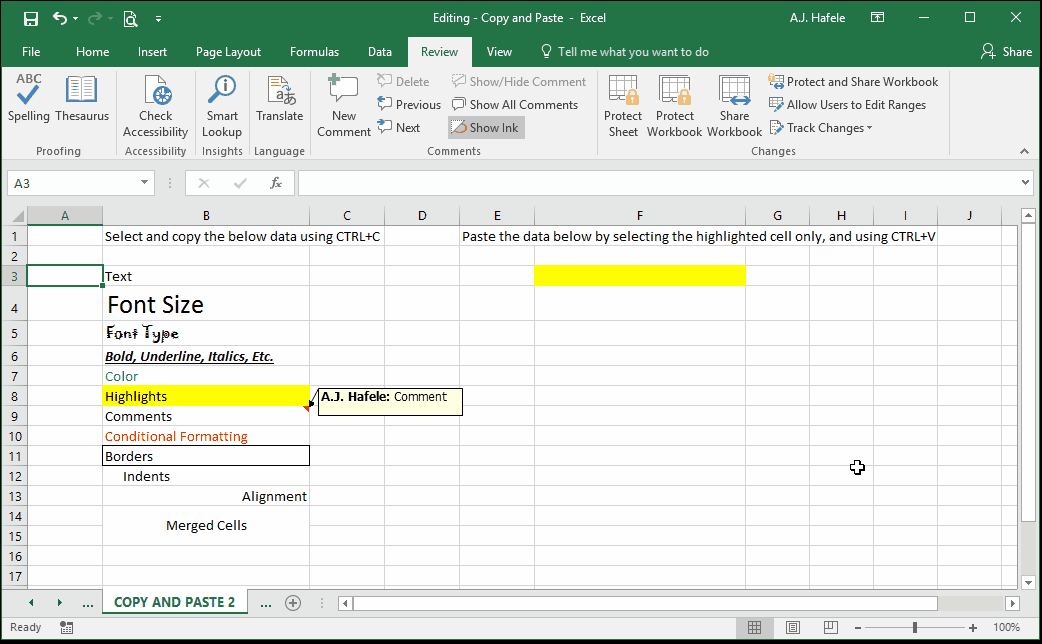
Pasting works on a multitude of items and formats, as shown in the above illustration
Note a few details in the above illustration:
The text in row 10 is colored red based on a conditional formatting rule that is created behind the scenes
When copied and pasted, the conditional formatting rule was also pasted to cell F10
Merged cells, which are giant combined cells, can be copied and pasted to form new merged cells, as was done with cells B14 and B15 above
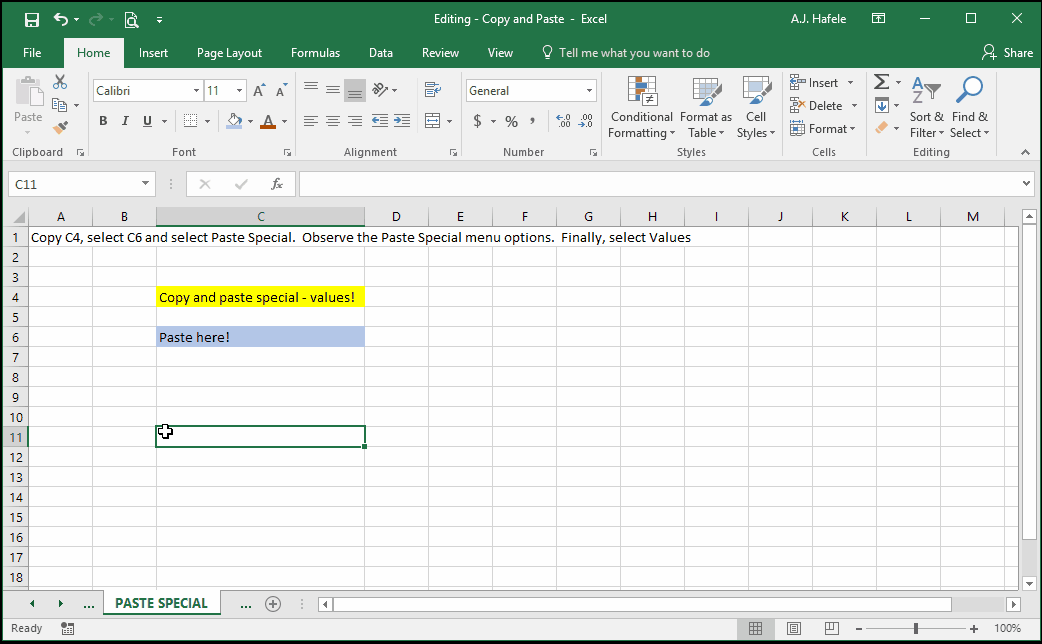
Paste Special
After copying data (CTRL+C), you can also choose to use Paste Special (CTRL+ALT+V) instead of the normal paste functionality shown earlier
Paste special works in a manner similar to paste, except you can control exactly which attributes are pasted
In the above illustration, notice that the cell values were pasted, but the blue highlight (i.e. the format) was unchanged
As mentioned earlier, when you paste special, the following menu will appear:
Note that the underlined letters correspond to keyboard shortcuts
Now, let's go through the various paste special options to choose from
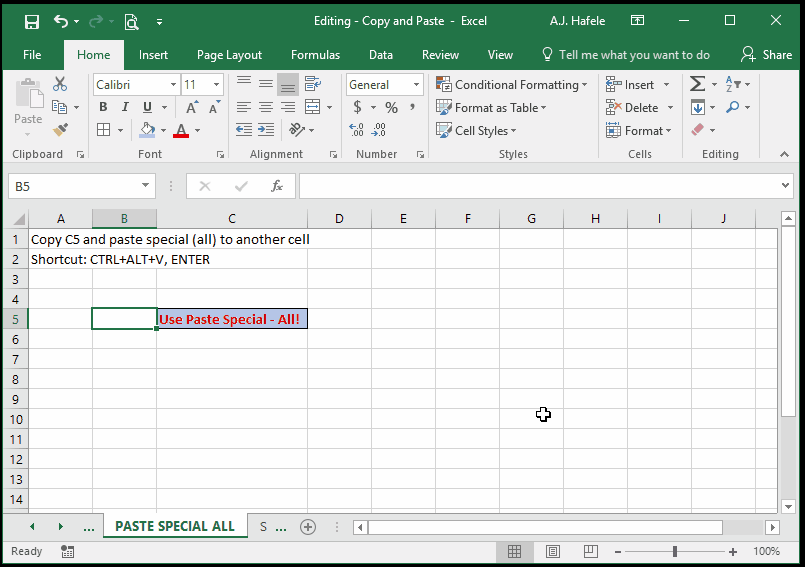
Paste Special – All
This option is a bit redundant, given that it works the same way as as a normal paste (CTRL+V) as shown in earlier examples
Observe as we use Paste Special (All) using the CTRL+ALT+V, ENTER shortcut:
As you can see, Paste Special (All) is the default option in the Paste Special menu
As an alternative to using the keyboard shortcut, feel free to use the Paste Special... button in the Home tab instead
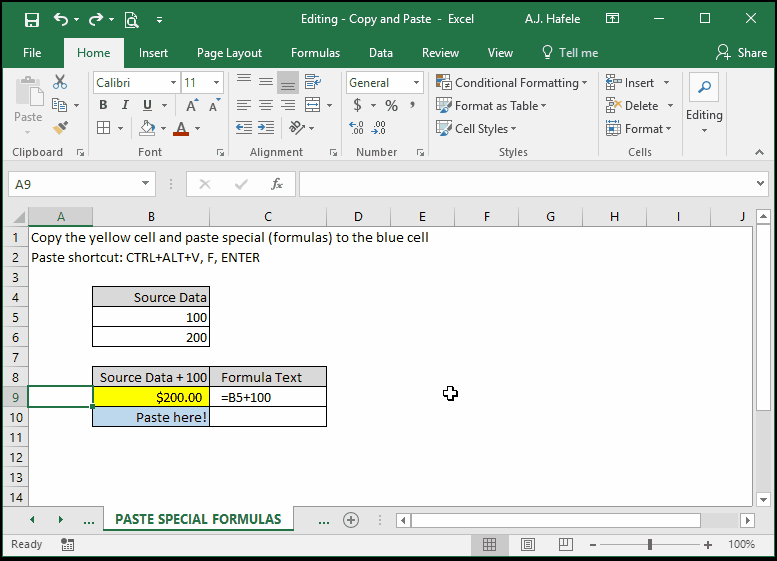
Paste Special – Formulas
This option will paste only cell formulas and nothing else - no comments, fonts, borders, etc. - as shown here:
Notice that:
Only the formula - not the formatting - was pasted
The resulting formula is structurally the same, except a different cell is referenced (=B6+100 instead of =B5+100). Why?
This relates to the way the cells are referenced, which will be discussed later (here)
Last, if copied cells do not contain formulas, the cells' values will be pasted instead
Paste Special – Values
This option will paste only cell values (i.e. what the cells show)
If you Paste Special (Values) a formula, only the constants (i.e. the output) will be pasted, as shown here:
Notice that the constant value of 200 (no formula or formatting) is the only thing that was pasted, and not the formula
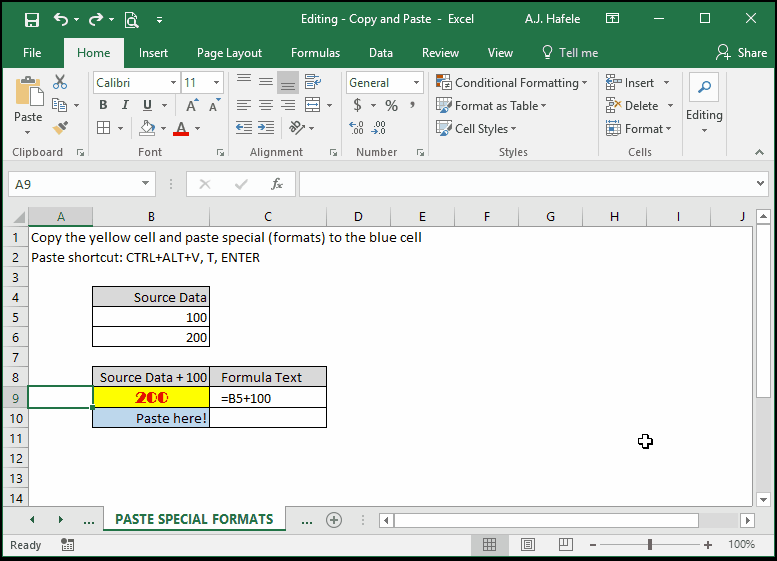
Paste Special – Formats
This option only pastes cell formatting (font, border, color, etc.)
No cell contents, such as formulas or constants, are pasted
Note that conditional formatting rules (discussed here) are also pasted when this option is used
Observe as we copy and Paste Special (Formats) using CTRL+ALT+V, T, ENTER:
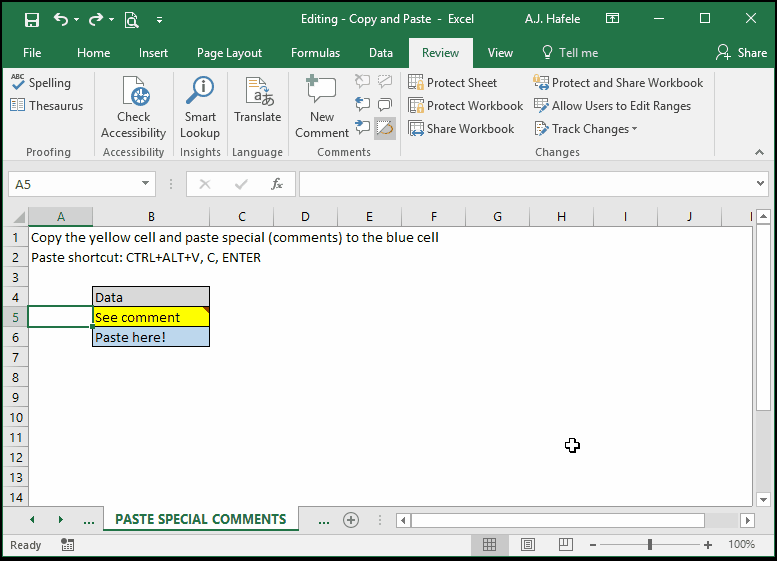
Paste Special – Comments
Cell comments are sort of like sticky notes for cells
They are flagged boxes of text that can be added to each individual cell, but they do not impact the values contained within the cells (they overlay cells, in a sense)
When selected, Paste Special (Comments) will only paste cell comments, which are indicated by the small red triangles at the top-right corner of cells, as shown here:
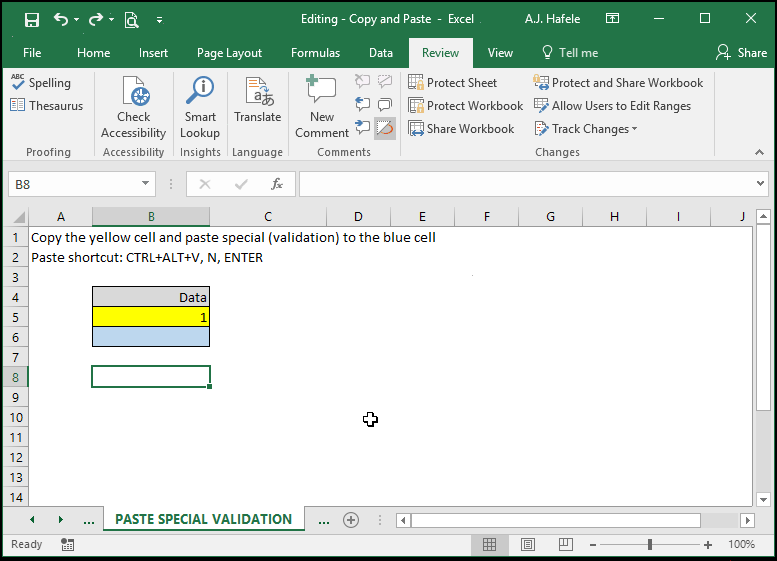
In brief, data validation rules restrict what data can and cannot be entered in cells
In the following example, the yellow cell contains a data validation rule which only allows you to select the numbers 1, 2, or 3
Observe as we copy and paste that rule to the blue cell:
After pasting the validation rule, the blue cell has a drop-down box restricting you 1, 2, or 3
Paste Special – Transpose
This option will allow you to copy a vertical range of data and paste it into a horizontal range (or vice versa), as shown here:
Notice that formats and formulas were pasted in this example, since the "All" option was also selected (at the very top of the Paste Special menu)
However, you can paste and transpose specific attributes, such as values only
To paste values while transposing data, check "Transpose" and select the "Values" option in the Paste Special menu
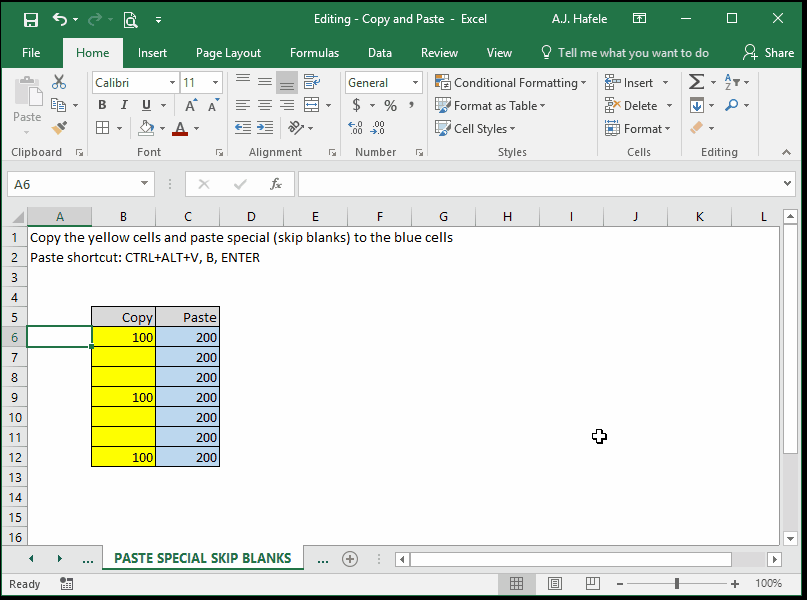
Paste Special – Skip Blanks
This option will paste cells with content only (i.e. with formulas or constants) but will not paste any data from blank cells, as shown here:
Notice that, since the blank yellow cells contained no content, they were not pasted, and the corresponding blue cells remained untouched
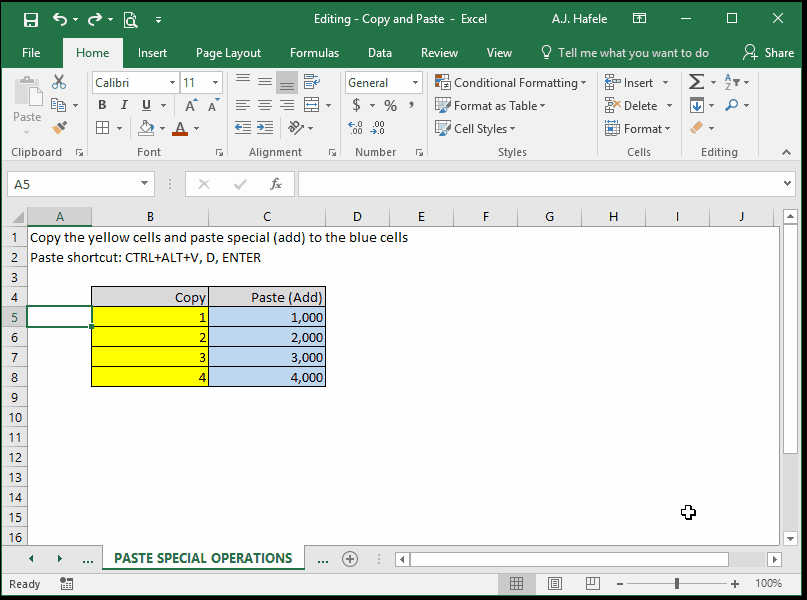
Paste Special – Operations
These options allow you to perform an operation when copying and pasting a set of numbers over another set of numbers
The available operations include Add, Subtract, Multiply, and Divide
Observe as we use Paste Special (Add) to add the copied numbers to the numbers in the pasted cells:
Again, the formatting (i.e. cell highlights) changed since "All" was selected in the Paste Special menu
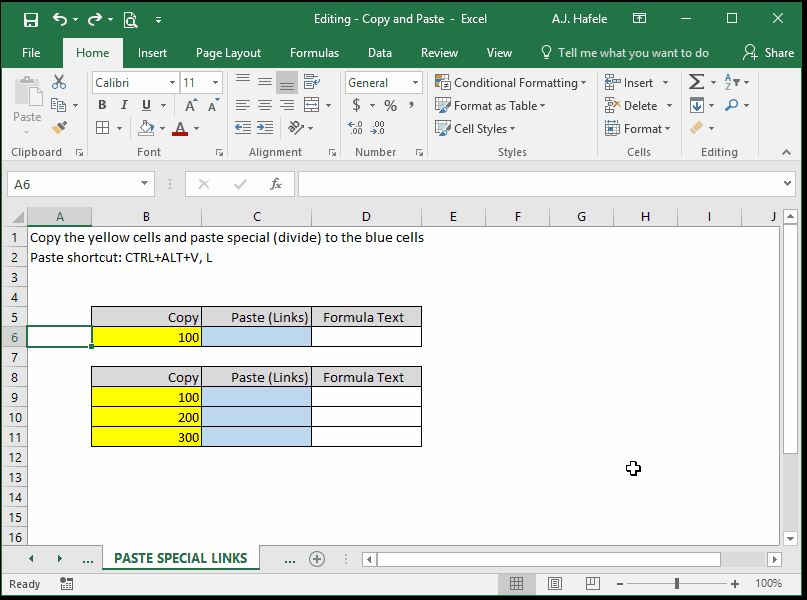
Paste Special – Paste Links
Rather than pasting values or formulas, this option will paste links to the copied data
If you copy a single cell, the pasted link will have an absolute cell reference (e.g. =$A$1)
If you copy multiple cells, the pasted links will have a relative cell reference (e.g. =A1, =A2, and =A3)
Observe as we paste links to 1) a single cell and 2) multiple cells (first with a mouse and then with CTRL+ALT+V, L):
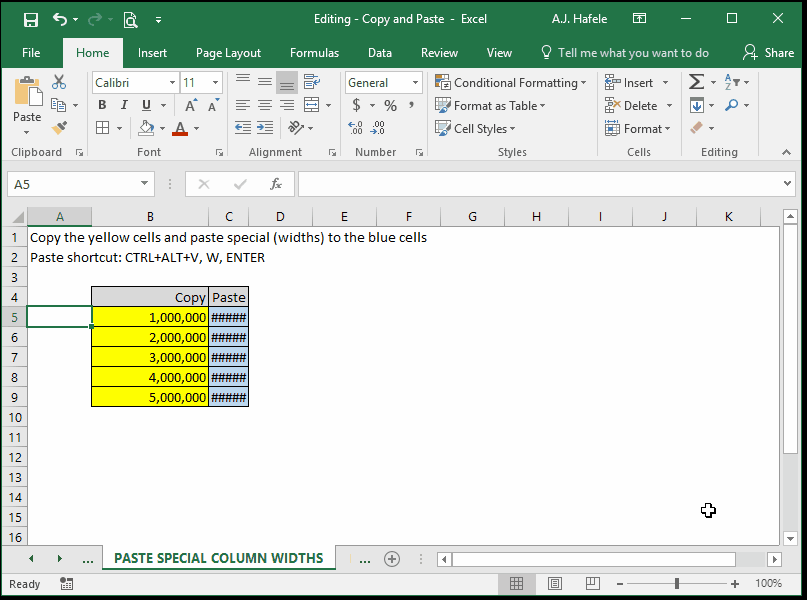
Paste Special – Column Widths
This option pastes only the width of the columns copied and nothing else
Observe as we copy and paste column widths:
Note that the blue cells contain formulas which are not affected by the Paste Special (Column Widths)
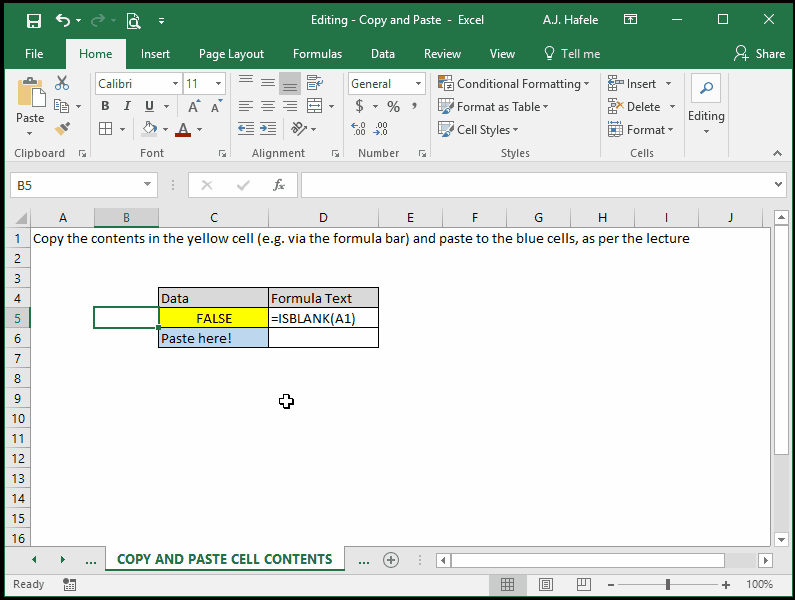
Copy and Paste Exact Cell Formula
Sometimes, users want to duplicate the exact same contents contained in the formula bar of a cell
In such situations, simply select the data contained in the formula bar, copy it using CTRL+C, press ESC to get out of the formula bar without modifying the copied cell, and paste it to the appropriate cells using CTRL+V, as shown here:
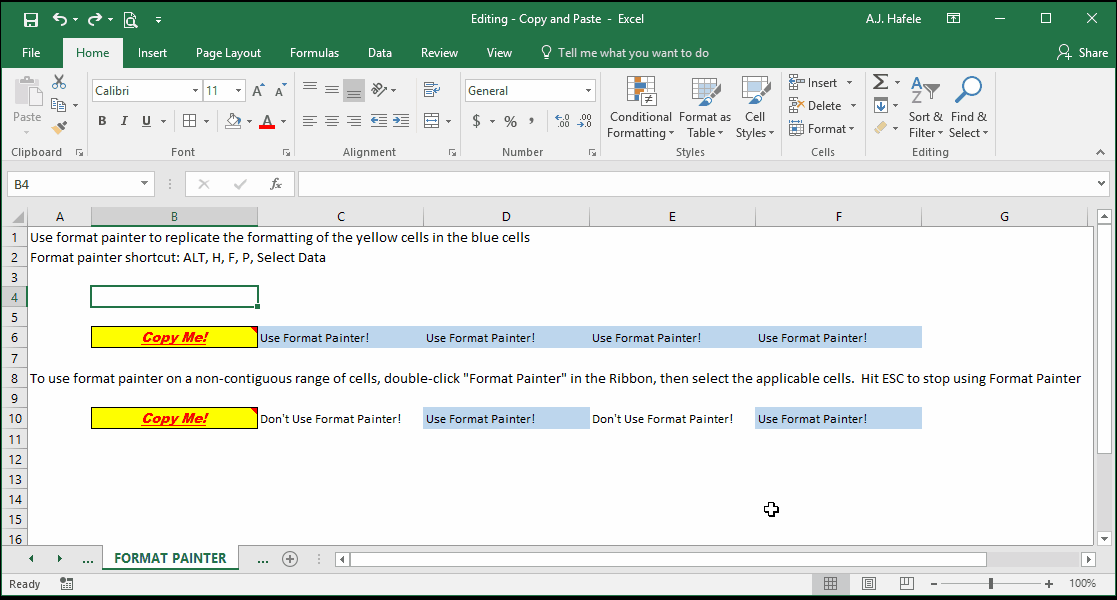
Format Painter
Format Painter is a quick way to replicate the exact formatting of cells
To use Format Painter:
Select the cell with the desired formatting
Press ALT, H, F, P (or click the Format Painter button)
Select the target cells; immediately after selecting the target cells, their formats will be "painted"
To paint formats to a non-contiguous range, double-click Format Painter and then select the relevant ranges
Observe as we use Format Painter on both contiguous and non-contiguous ranges (we use the shortcut on the contiguous range):
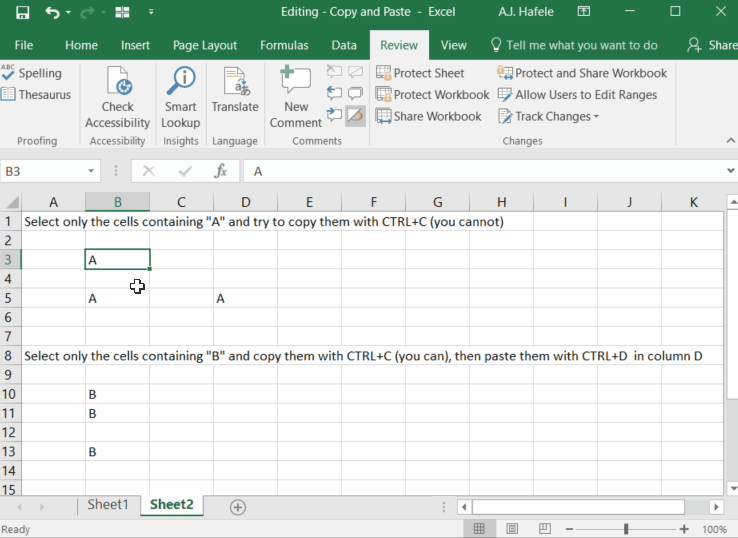
Copy and Paste Non-Contiguous Ranges
When attempting to copy and paste non-contiguous ranges, keep the following detail in mind:
You cannot copy a non-contiguous range that spans both rows and columns
You can copy and paste a non-contiguous range that spans only rows or columns
Observe what happens in the following example:
Notice that the three pasted letters ("B") are now in a single contiguous column of data
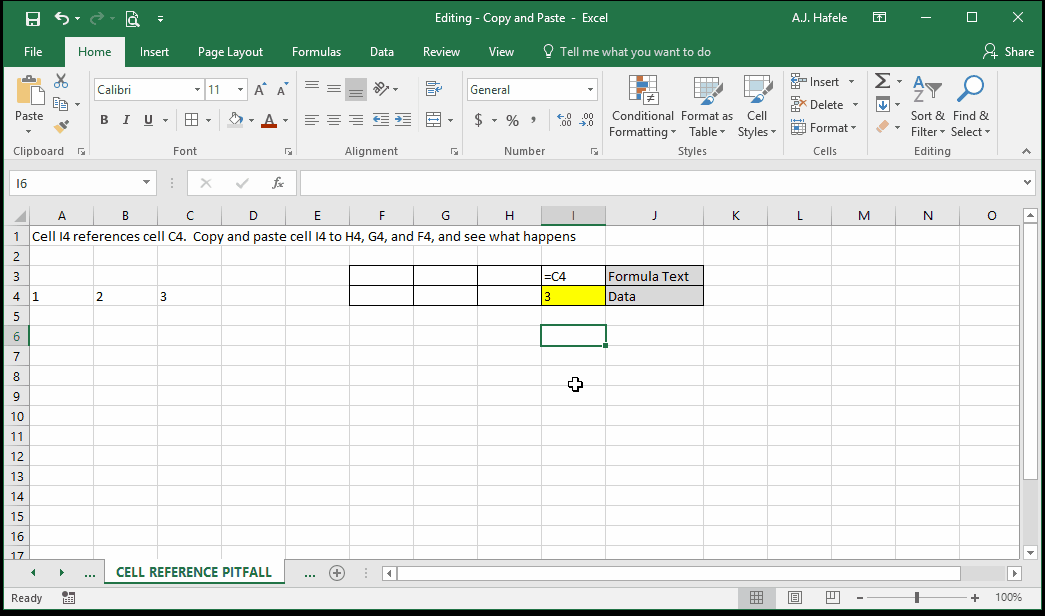
Pitfall – Pasting Cell References
It is important to highlight a common problem when copying and pasting cells containing cell references
It is easier to explain with a simple illustration
Observe as we perform a simple copy and paste of cells containing relative cell references:
Why was there a #REF! error in cell F4?
First, notice that each time cell I4 is pasted, the reference moves one cell to the left (from C4 to B4 to A4)
But there is nothing to the left of A4!
As such, you have effectively "fallen off" the worksheet when copying and pasting these cell references
Note that this issue can be mitigated by using mixed or absolute cell references, but for now, just recognize that you can "fall off" the worksheet when copying and pasting cells with cell references (particularly relative or mixed references)